How to Make A DIY Bin Cage For Your Hamster
Hamsters may be small but that is no excuse for a small cage. Many of the cages you find at pet stores are way too tiny for your hamster to be in a suitable environment and fulfill their happiness. Instead of sticking your hamster into these tiny cages, why not make your own larger DIY one?
DIY bin cages have been becoming more and more popular within hamster owners! Here are the supplies you will need…
- A large bin (at least 450 sq inches of floor space & tall enough for proper size wheel)
- Wire mesh
- Wire cutter
- Nuts, bolts, and washers OR zip-ties
- Drill
- Box cutter/knife/small saw (dremel)
- Permanent Marker
We earn a commission if you shop through the links on this page (Thanks!).

![]()

- RUBBERMAID QUALITY - Holding up to 14% more than other storage bins the same size, you receive reliable lidded home storage organizers that can fit all your items safely with the shatter free, durable polypropylene material made in the USA
- PERFECT FOR EVERYDAY ORGANIZING - Find the unexpected joy in home organization with the easy-to-view straight wall tote design that maximizes shelf and drawer space and is ideal for craft supplies, hats, gloves, shoes, kitchen storage, bedroom underbed storage , classroom, toys, tools and more.
- STRONG LATCHING LID - Rubbermaid storage containers with lids close securely with handles attached to the base keeping items dry and dust-free, perfect for home organization and garage cleanup
Step 1- Preparing The Lid
*First plan out where you would like the mesh wire window/s to go. Make sure you leave at least 2 inches between where you are cutting and the edge of the lid
If you are under the age of 18 make sure you have adult supervision.
Start by using your box cutter/knife/small saw to cut out where you would like the mesh to go. Once you have cut out the space remove the piece of plastic.
Next, mark out where you will the drill holes using your permanent marker. It’s best to have them about 3 inches (7.6 cm) apart. Once you have figured out where the holes are going to go, put your lid on the bin and begin drilling. These holes will be used to attach the wire mesh.
No products found.

Step 2- Attaching The Wire Mesh
Now it’s time to prepare and attach the wire mesh to the lid. Measure out the length and width of your lid and then cut out the mesh using your wire cutter. The size will vary depending on the size of your bin.
Then, attach the wire mesh to the lid using your nuts, bolts, and washers OR zip-ties….
If you are using nuts, bolts, and washers, simply thread a screw through each hole, put on the washers, and fasten them with bolts. If you are using zip-ties, thread a zip-tie through each hole, secure them, and pull to tighten. Afterwards snip the ends of the zip-ties so that they don’t stick out.
Some people also decide to repeat step 1 + 2 on a side of their bin but it isn’t necessary.


Step 3- Drill Air-Holes (Optional)
To ensure your that hamster is going to get enough ventilation it its cage, drill some extra ventilation holes along the top of the bins side/s.
Setting up the Cage…
If you haven’t already, it is recommended to wipe down your bin cage with a disinfectant. A hamster safe solution would be to combine half water & half vinegar. This will get any harmful chemicals out of the bin that could have been produced during manufacturing.
Setting up is pretty much the exact same as any other hamster cage. Consider reading Hamsters: The Ultimate Guide To Care, Cleaning, and Entertainment for more details. If you go on Pinterest or Google and type “Hamster Bin Cages” you can find some inspiration.
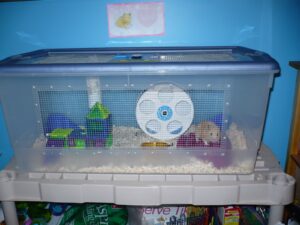
(Image Credit= Pinterest)
Installing a Water Bottle:
*Put in bedding before installing
The easiest way to attach a water bottle to the enclosure is using command strips or velcro. All you need to do is attach command strips/velcro to the back of the water bottle and then attach the other side of the velcro to a side of the bin.
Another option would be to get some wire/string and a drill. First you will need to drill a hole big enough for the spout of the water bottle to go through and 4 smaller holes a bit higher up. Make sure you know exactly where you want it because it will be hard to fix. Then, secure the bottle using the wire/string.
.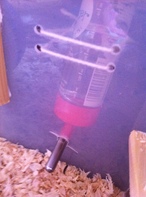
(Ex of water bottle by missangelames.weebly.com)
You can also buy a water bottle holder online or at a store.
No products found.
We hope you had fun building your own DIY hamster bin cage. Share your final result on Instagram and tag us @crittermamas! If a bin cage isn’t for you, no problem! Check out our IKEA Hamster Cage Ideas for a different and fun DIY project.